Updated on Jan 17, 2024, by Burt Miller
Hey there, fellow woodturning enthusiasts. Have you ever wondered if you can use a metal lathe for woodturning? If the answer is yes, then you’ve come to the right place. And if it’s no, don’t worry – there’s always something new to learn!
This guide is here to provide clarity on this topic, especially for beginners. We understand how overwhelming it can be to enter the world of woodworking without proper guidance. Consider this guide as your helpful companion.
Our goal is not just to teach you how to turn wood on a metal lathe. We also want to explain the reasons behind certain techniques and why others may not work. We’ll discuss the main differences between woodturning and metalworking on a lathe, provide tips on selecting the right wood for your projects, and even explore some handy techniques that will make your woodturning journey smoother.
So get ready, and let’s start turning!
The Fundamentals of Woodturning on a Metal Lathe
Let’s dive right into the nitty-gritty of woodturning on a metal lathe.
Woodturning versus Metalworking
Metal lathes are typically used to shape metal. However, they can also turn wood – with a few tweaks and adjustments. So, what’s the real difference between turning wood and metal?
- A metal lathe slices chips off the workpiece, while a wood lathe scrapes the wood.
- With metal turning, precision is key; it’s all about removing exact amounts of material. On the other hand, woodturning is more about achieving a desired shape or effect.
- For woodturning, you have to move your tool manually. In contrast, with metal turning, you can set your tool in place and let the machine do most of the work.
Understanding Your Metal Lathe
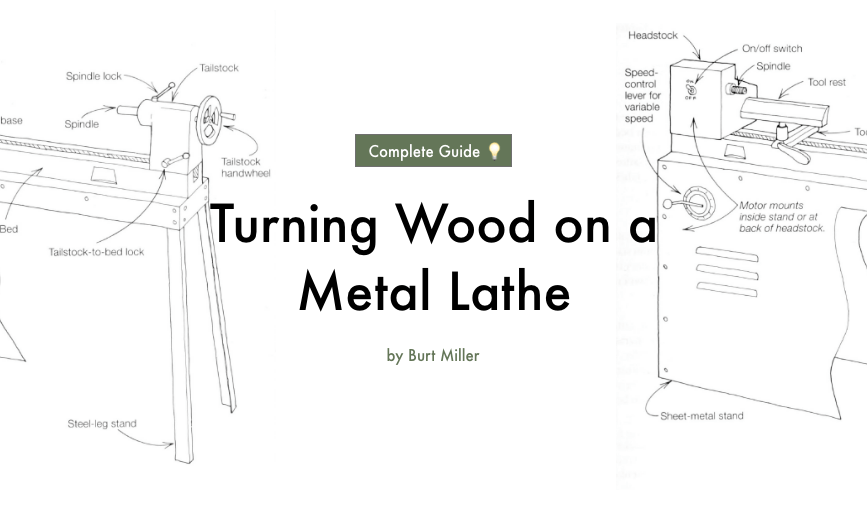
Before you start turning wood on a metal lathe, it’s essential to know your machine. Here are the key components:
- Headstock: This houses the motor and controls the speed of your workpiece.
- Tool rest: It’s where you place your tools when not in use. Adjust it for comfort and stability.
- Tailstock: It supports long pieces of wood but can be moved out of the way for bowl or plate projects.
Choosing Your Wood
There’s no one-size-fits-all answer to choosing wood for turning projects on a metal lathe. Some prefer hardwoods like oak or maple due to their durability and beautiful grain patterns. Others might opt for softer woods like pine or poplar because they’re easier to turn.
A good rule of thumb is to start with softer woods if you’re a beginner. As you gain confidence and skill, experiment with harder woods.
Woodturning Techniques for a Metal Lathe
Turning wood on a metal lathe isn’t exactly the same as doing it on a wood lathe. Here are some techniques that apply to this unique setup:
- Sharpen your tools: Woodturning needs sharp tools. Remember, you’re scraping, not slicing.
- Go slow: Start at a lower speed until you get comfortable with the process.
- Move your body: Use your entire body to guide the tool, not just your hands.
Playing with wood and metal lathes is like learning two different dances. Both are fun, but each has its own rhythm and steps. The trick is learning to lead with confidence and grace no matter which partner you’re dancing with.
Setting Up Your Metal Lathe for Woodturning Success
Let’s dive right in. Getting your metal lathe ready for a woodturning operation is like setting up a dinner table for guests – every utensil and plate has its place. And the key to a successful meal (or in our case, a perfect woodturning project) lies in the details of this setup.
Preparing the Metal Lathe
First things first, ensure your metal lathe is clean and free from any residual metal shavings or debris. Think of it as clearing off the crumbs before laying down the tablecloth. This helps prevent any unwanted scratches on your precious wood blank and also keeps your workspace tidy.
Next comes aligning and securing your tool rest at an optimal distance from the workpiece. Imagine being that courteous host who adjusts the chair perfectly for their guest to comfortably reach their plate. Your tool rest should be close enough to the workpiece to provide sturdy support for your tools, yet far enough to allow room for maneuverability. A good rule of thumb is to set it about the width of your chisel away from your workpiece. For more on tool rest placement, you might find this Wood Lathe Tool Rest 101: Everything You Need to Know guide helpful.
Understanding Chucks
When it comes to clamping your wood blank securely onto the lathe, chucks are your best friends in this dining scenario – they’re like those handy little clamps that keep the tablecloth from flying away in a gust of wind. Different types of chucks serve different purposes:
- A four-jaw chuck offers great versatility with its independently adjustable jaws – perfect for asymmetrical or irregularly shaped projects.
- A scroll chuck uses a single key to adjust all jaws simultaneously, making it quick and easy to secure symmetrical workpieces.
- A collet chuck is great for holding small, delicate items securely without causing damage.
Choose your chuck based on the needs of your project and the shape of your wood blank.
Selecting RPM Speeds
Finally, selecting the right RPM speed for your project is like choosing the right music to set the mood at dinner. Too fast and it’s like a wild party when you were hoping for a chill vibe; too slow and it can feel like watching paint dry.
For woodturning on a metal lathe, the guideline is simple: bigger diameter – slower speed, smaller diameter – faster speed. For instance, a workpiece with a diameter of 2 inches can safely be turned at around 1800-3000 RPM, while a 10-inch diameter piece should be turned at speeds between 600-1000 RPM.
Setting up your metal lathe for woodturning doesn’t have to be intimidating. With these essential steps in mind, you’re already well on your way to creating beautiful wooden masterpieces on your metal lathe.
Must-Have Tools for Woodturning on a Metal Lathe
Turning wood on a metal lathe calls for some specific tools. Let’s dive into the toolbox, shall we?
Essential Cutting Tools
Your cutting tools will be the stars of your woodturning show. They’ll do the heavy lifting, shaping your wood into something extraordinary. Two key players are:
- Spindle Roughing Gouge – Think of it as the bouncer at a club. It takes care of rough and rowdy wooden pieces, turning them into well-behaved, round pieces ready to party.
- Bowl Gouge – The bowl gouge is like a skilled sculptor, perfect for hollowing out bowls and creating those elegant curves.
Remember, patience is key. Your tools will do their job, but like a good barbecue, it can’t be rushed.
The Artful Router Bit
Now let’s talk about adding those fine details that make your work stand out. Enter the router bit. Like an artist adding final strokes to a masterpiece, router bits add intricate patterns and designs to your turned pieces.
Router bits come in many shapes and sizes. Some even come with different profiles – think of it as choosing different brushes for painting. Experiment with these to find which ones match your style and project needs.
Custom Tool-Post Design: The Game-Changer
Let’s talk about the secret weapon in our woodturning arsenal: custom tool-post designs for metal lathes. These give you enhanced control and versatility in your operations.
Imagine trying to paint a delicate watercolor with a broad brush meant for house painting – it wouldn’t be pretty! Similarly, using standard tool-posts might not give you the control you need for detailed woodturning work. Custom tool-posts are designed specifically for this purpose.
In addition, these tool-posts can hold multiple tools at once. It’s like having an extra pair of hands. Change tools quickly, adjust heights easily, and work with greater precision.
Note: Always ensure your tools are sharp. Working with blunt tools increases the risk of mishaps.
As you gather your woodturning tools, remember that it’s not just about having the right tools but understanding how to use them. Practice makes perfect. Don’t be afraid of making mistakes – they’re stepping stones on your path to woodturning mastery.
Safety Precautions and Maintenance for a Smooth Woodturning Experience

Venturing into the world of woodturning on a metal lathe can be wildly exciting. However, amidst all that fun, let’s not forget an essential aspect of the game – safety. Picture this: once upon a time, a passionate beginner jumped straight onto their metal lathe without understanding the safety measures and ended up with flying wood chips in their eye. Not quite the fun they had in mind, right?
Prioritize Safety at All Times
So here’s the deal – always prioritize safety. Start with wearing fitting clothes and avoiding any loose accessories that could catch on your machine. Safety goggles are an absolute must to protect your eyes from flying debris. Always remember to wear ear protection because, let’s admit it, no one enjoys the sound of a squeaky machine.
Also, never underestimate the importance of using a face mask or respirator to prevent inhaling fine dust particles. It may feel like overkill initially, but trust us; your lungs will thank you later!
To delve deeper into woodturning safety and learn more about workspace setup, gear, and proactive safety practices for a secure crafting experience, check out these essential tips on how to stay safe and enjoy your craft.
Cleaning Up After Yourself
Moving on to our next important point – cleaning up after yourself! As beautiful as wood shavings look fluttering down from your lathe, they’re not so pretty lying around your workshop floor. The solution? A handy tool known as a shop vac. This beast can suck up sawdust, wood chips and debris like there’s no tomorrow. It makes cleaning up quick and easy without causing any damage to your machine or tools.
Protecting Your Metal Lathe
Now that we’ve covered cleaning up after your turning session, let’s talk about protecting your precious metal lathe from woodworking particles. It might seem like a minor concern but believe us when we say that these minuscule particles can cause havoc to your machine over time. So how do we combat this? By using a protective cover for machines. This will keep those pesky particles at bay and save you on maintenance costs in the long run.
Routine Maintenance Practices
Speaking of maintenance, it’s crucial to keep your metal lathe in optimal condition for your woodturning operations. Here are some routine maintenance practices to follow:
- Regularly inspect your lathe for any worn out or damaged parts and replace them promptly.
- Keep an eye on the alignment of the headstock and tailstock; a misalignment can lead to less accurate turning and more strain on your machine.
- Lubricate the moving parts periodically. It’s like giving your machine a much-needed spa day!
- Always remember to unplug your machine before any maintenance activity because safety first, right?
By following these safety guidelines and routine maintenance practices, you’ll ensure a smooth and safe woodturning experience. After all, woodworking is meant to be enjoyable and not a trip to the emergency room.
Exploring the Pros and Cons of Woodturning on a Metal Lathe
When you dive headfirst into woodturning using a metal lathe, it’s like embarking on a new adventure in a familiar forest. There are paths you know, but also many new trails to discover. Let’s take a look at the advantages and disadvantages of this craft.
Advantages:
- Precision: A metal lathe is designed with accuracy in mind, allowing you to create wooden pieces with intricate details.
- Sturdiness: These machines are built to be strong and durable, capable of withstanding the forces involved in woodturning without any issues.
- Versatility: With a metal lathe, you have a tool that can be used for both woodworking and metalworking, making it perfect for those who like to work with different materials.
Disadvantages:
- Speed Limitations: Metal lathes often have lower maximum speeds compared to their wooden counterparts, which can affect the final surface finish of your projects.
- Lubrication System: The oil used in metal lathes for smooth operation can mix with wood chips and dust, creating a messy situation.
- Tool Rest Design: The design of tool rests on metal lathes may not always be as user-friendly for woodturning purposes when compared to those found on wooden lathes.
For beginners, it’s important to keep in mind that woodturning on a metal lathe is not just about pushing boundaries; it’s also about mastering the fundamentals along the way. Just like an artist needs to understand their brushes before creating a masterpiece, you’ll want to become familiar with the quirks and features of your metal lathe. This way, you’ll be able to produce stunning pieces that are not only visually appealing but also structurally sound. The key is to balance the excitement of trying new techniques with the wisdom of building a strong foundation of skills. Happy turning!
FAQs(Frequently Asked Questions)
Woodturning on a metal lathe differs from metalworking in that metal lathes are traditionally used for shaping metal but can also be used for turning wood with the right setup and tools.
Some essential tips for setting up a metal lathe for woodturning success include ensuring the lathe is clean and free of debris, understanding how to use chucks to secure the wood blank, and selecting the appropriate RPM speed for the project.
Must-have tools for woodturning on a metal lathe include essential cutting tools, such as gouges and chisels, as well as router bits for adding fine details to the turned wood. Additionally, custom tool-post designs can be game-changers in enhancing woodturning capabilities.
Safety should always be prioritized when engaging in woodturning on a metal lathe. This involves wearing appropriate safety gear, cleaning up after each turning session, and maintaining the metal lathe regularly to ensure safe operation.
An advantage of using a metal lathe for woodturning is its precision due to being designed with accuracy in mind. However, a disadvantage is that metal lathes often have lower maximum speeds compared to dedicated wood lathes, which can limit the speed at which wood can be turned.